Softphone Setup
From Taridium
(→Client Setup) |
|||
| (2 intermediate revisions not shown) | |||
| Line 18: | Line 18: | ||
These details are generally displayed in the administrator's panel under '''Users''' → '''SIP Channels'''. Click on the [[Image:edit.gif]] button to see the corresponding user name and password (secret). If you have Additional Line/Softphone module installed you will see the details on your '''User Panel''' → '''Features''' → '''Additional Line/Softphone'''. | These details are generally displayed in the administrator's panel under '''Users''' → '''SIP Channels'''. Click on the [[Image:edit.gif]] button to see the corresponding user name and password (secret). If you have Additional Line/Softphone module installed you will see the details on your '''User Panel''' → '''Features''' → '''Additional Line/Softphone'''. | ||
| + | |||
| + | If your softphone client is behind '''NAT''', make sure the NAT option is turned on in your channel configuration. This is required in most cases when you are connecting from a remote location behind a router/firewall. | ||
| + | |||
| + | [[File:nat.png]] | ||
=== Client Setup === | === Client Setup === | ||
| Line 48: | Line 52: | ||
[[Image:xlite-step4.png]] | [[Image:xlite-step4.png]] | ||
| + | |||
| + | The [[Image:Ok1.gif]] will indicate a correctly registered softphone. | ||
Latest revision as of 17:10, 2 April 2012
Taridium's ipbx supports most SIP 2.0 compatible softphones. These quick guides will help you get started with our recommended softphone clients.
CounterPath X-Lite
You can download X-Lite from CounterPath. You have to be sure that you have already installed ipbx and configured your general SIP settings.
ipbx Setup
You can either use your softphone as your primary channel (main phone) or as an additional channel to your extension. For details on how to setup a user please follow the instructions here. If you wish to setup your softphone as additional line and you have the Additional Line/Softphone module installed, follow the instructions here.
You will need to know three configuration items to register your SIP phone.
- Server IP address or DNS Name (usually SIP Proxy and Registrar)
- SIP user name
- SIP password (secret)
These details are generally displayed in the administrator's panel under Users → SIP Channels. Click on the ![]() button to see the corresponding user name and password (secret). If you have Additional Line/Softphone module installed you will see the details on your User Panel → Features → Additional Line/Softphone.
button to see the corresponding user name and password (secret). If you have Additional Line/Softphone module installed you will see the details on your User Panel → Features → Additional Line/Softphone.
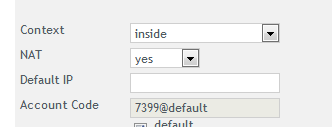
If your softphone client is behind NAT, make sure the NAT option is turned on in your channel configuration. This is required in most cases when you are connecting from a remote location behind a router/firewall.
Client Setup
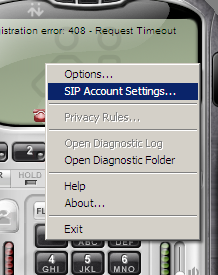
After installation, start the X-Lite client and right click to display the context menu SIP Account Settings...
Click on Add... to add a new account:
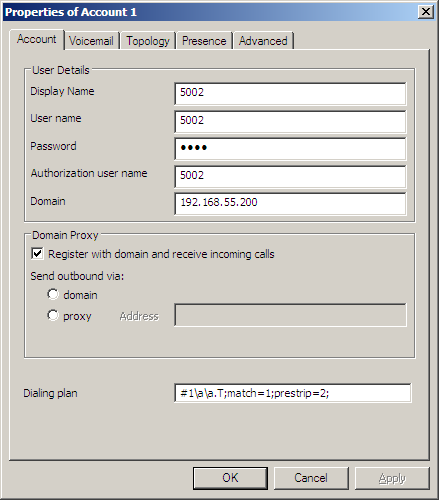
In this example we are using the following values:
- Display Name: 5002 - The SIP display name
- User name: 5002 - The SIP user name
- Password: ****** - The SIP password (secret)
- Authorization user name: 5002 - the SIP authentication name
- Domain: 192.168.55.200 - this is your server's IP address
In X-Lite the Domain is your registrar, proxy and domain.
Click on OK to save your settings and close the accounts dialog. X-Lite should immediately attempt to register with your ipbx system:
If you have trouble registering, re-check your username and password. Note that many registration issues that arise with softphones are caused by NAT problems. You will have to configure your network firewall accordingly and almost always have a public IP address setup on your ipbx system.
On your taridium system, you can check for proper registration by navigating to System → SIP Channels


